After my first post on "What is behavior driven development" this is an extension to this post as implementation and practical of BDD. We are going to use following libraries/frameworks in this tutorial :
now right click inside this view and select Generate step definition as shown in figure :

This will generate steps definition file for your scenrio , now you can use tag above your class binding like this :
- SpecFlow : BDD library/framework , works on Given, When and Then keywords where Given relates to preconditions, when represents occurrence of an event and Then is testable outcome. Provides facility to write testing scenarios in human language ( DSL , domain specific language ).
- Resharper : To run unit tests.
- NUnit : Unit testing framework
- Coypu: Provides fast browsing of web applications to access elements i.e. buttons, links , fields and etc on a web page.This is irrelevant from above exercise( just in-case you are interested in UI testing).
To start practicing you first need to download/install following :
- Install specflow ide integration from their official website : http://www.specflow.org/getting-started/
- Install library package for specflow from nuget ( open package manager console and run "Install-Package SpecFlow" command from your visual studio i.e. Tools-->Library Package Manager-->Package Manager Console )
- Same as above run these commands "Install-Package NUnit","Install-Package Coypu" for installation of NUnit and Coypu libraries respectively.
And that it , you are ready to go.
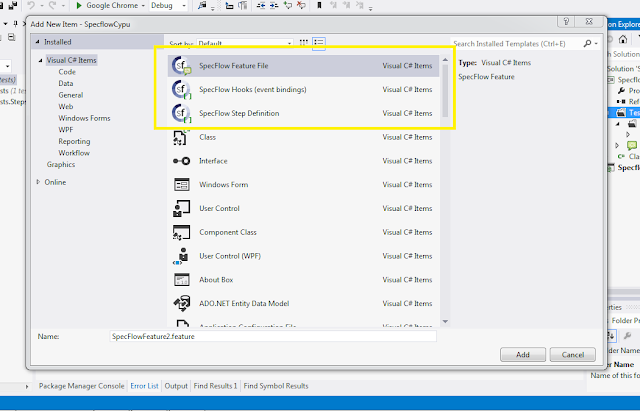
Now when you are going to add new file into your project , you will see three more file extensions in add new file popup window as shown in following figure:

Now start with adding Specflow feature file , this will contain following default data in it :

Feature: SpecFlowFeature1
    In order to avoid silly mistakes
    As a math idiot
    I want to be told the sum of two numbers

@mytag
Scenario: Add two numbers
    Given I have entered 50 into the calculator
    And I have entered 70 into the calculator
    When I press add
    Then the result should be 120 on the screen
Where "@mytag" is used for scope i.e. in step definition file we can specify the scope of definition by declaring [Scope(Tag = "mytag")] on top of the class.
By default the color of Given,when and then statements will be pink and that means there is not binding yet for these steps as shown in figure below :

now right click inside this view and select Generate step definition as shown in figure :

This will generate steps definition file for your scenrio , now you can use tag above your class binding like this :
  [Scope(Tag = "mytag")]
    [Binding]
    public class FirstSecenrio
    {
Now you are ready to run your tests , open re sharper test window and start running your tests.
To work with coypu , you must configure your browser settings in BeforeTestRun method of your binding class and start accessing your webpage controls, see https://github.com/featurist/coypu-jvm page for this.
Your binding class after coypu browser settings will look like this :
using System; using System.Collections.Generic; using System.Linq; using System.Text; using Coypu; using Coypu.Drivers; using Coypu.Drivers.Selenium; using NUnit.Framework; using TechTalk.SpecFlow; namespace SpecflowCypu.Tests.StepsDefinitions { [Scope(Tag = "mytag")] [Binding] public class FirstSecenrio { private static BrowserSession browser; [Test] [BeforeTestRun] public static void BeforeTestRun() { SessionConfiguration sessionConfiguration = new SessionConfiguration(); sessionConfiguration.AppHost = "localhost"; sessionConfiguration.Port = 5555; sessionConfiguration.SSL = false; sessionConfiguration.Browser = Browser.Firefox; browser = new BrowserSession(); } [Test] [AfterScenario] public static void AfterScenario() { } [Test] [Given(@"I have entered 50 into the calculator")] public void GivenIHaveEntered50IntoTheCalculator() { browser.Visit("https://gmail.com"); // ScenarioContext.Current.Pending(); } [Test] [Given(@"I have entered 70 into the calculator")] public void GivenIHaveEntered70IntoTheCalculator() { //ScenarioContext.Current.Pending(); } [Test] [When(@"I press add")] public void WhenIPressAdd() { //ScenarioContext.Current.Pending(); } [Test] [Then(@"the result should be 120 on the screen")] public void ThenTheResultShouldBe120OnTheScreen() { //ScenarioContext.Current.Pending(); } } }That was very short and to the point tutorial on BDD using specflow , will explain more very soon.
No comments:
Post a Comment